The rooftop solar installation process in India is two jobs running in parallel: the physical work on the roof, which takes a few days, and the paperwork with the DISCOM and the national portal, which takes most of the calendar time. Here is the whole sequence, in the order it actually happens, with the points where jobs get stuck.
This guide is written for installers and for homeowners who want to know what their installer should be doing. It follows a subsidised residential job under PM Surya Ghar; a commercial system skips the subsidy steps but the engineering and DISCOM steps are the same.
The rooftop solar installation process at a glance
| Stage | Who does it | Typical time |
|---|---|---|
| Site survey and proposal | Installer | Same visit to 2 days |
| Portal application and DISCOM feasibility | Consumer + vendor | 1–3 weeks |
| Agreement, advance and material dispatch | Installer | 1–2 weeks |
| Structure, modules, wiring on the roof | Installer's crew | 1–3 days |
| Net meter application and DISCOM inspection | Vendor + DISCOM | 1–4 weeks |
| Commissioning certificate and subsidy credit | DISCOM + portal | Up to 30 days after commissioning |
Add it up and a clean residential job runs six to twelve weeks from enquiry to subsidy in the bank. Tell customers this number at the first visit. The installer who promises two weeks is the one who gets the angry calls in week five.
Step 1: The site survey
Everything downstream is decided here, so it is worth doing properly rather than guessing from a photo.
- Usable roof area. Measure the terrace, then subtract the water tank, stair room, dish antenna, vents and the space you need to walk around the array. A 3 kW system needs roughly 250–300 sq ft of unshaded area on an elevated structure.
- Shade. Note the height of tanks, parapets, the stair room and anything taller within about 12 m — a neighbour's building, a tree, a mobile tower. Winter shadows are the long ones; a roof that looks clear in May can lose two hours a day in December.
- The electricity bill. Read the consumer number, sanctioned load, tariff category and twelve months of units. The sanctioned load caps the system size the DISCOM will approve, and the units decide the size worth installing. Our guide on how to size a system from the bill works through the arithmetic.
- The roof itself. Slab age and condition, waterproofing, parapet height, how material will reach the terrace, and where the inverter can sit — shaded, ventilated, within reach of the meter.
- Earthing and cable route. Where the earth pits can go and how far the DC and AC runs will be. Long runs cost money and voltage.
Step 2: Proposal, application and feasibility
Once the survey is done, the customer gets a proposal with the system size, the bill of materials, the PM Surya Ghar subsidy, the net cost and the payback. What a complete quote should contain is in our solar quotation format guide, and you can check the subsidy and savings for any bill with our free solar subsidy calculator.
For a subsidised job, the consumer then registers on the national PM Surya Ghar portal, applies with the consumer number and selects a vendor registered with that DISCOM. The DISCOM examines the application for technical feasibility — whether the transformer and the connection can take the proposed system — and approves or rejects it.
Do not buy material before feasibility approval. If the DISCOM cuts the size down, panels already sitting in the customer's garage become a negotiation you will lose. The amounts, slabs and eligibility rules are covered in our PM Surya Ghar subsidy guide.
Step 3: Agreement, advance and material
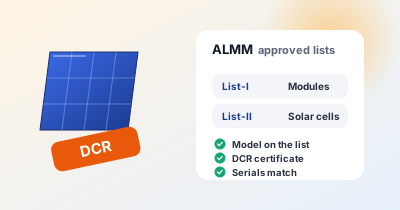
With feasibility in hand, sign the work order, take the advance and dispatch material. For a subsidised system the modules must be from the ALMM list and DCR (domestic content) cells and modules are mandatory — a non-DCR module will pass the eye but fail the subsidy claim.
The standard delivery for a home system is modules, inverter, mounting structure, DC and AC cable, DCDB and ACDB with SPDs and breakers, earthing kit, lightning arrester, MC4 connectors, cable trays or conduit, and the fasteners. Check quantities against the bill of materials before the crew leaves; a missing 4 sq mm cable drum costs a day.
Step 4: The structure
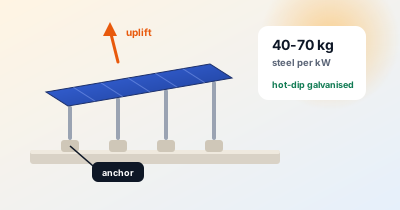
The crew marks out the array, drills and fixes the pedestals, and grouts or chemically anchors them to the slab. On an elevated structure the legs go up next, then the purlins and rails.
Three things decide whether this structure is still standing in ten years: the anchor holding down the wind uplift, the galvanising on the steel, and the clearance left for cleaning and maintenance. Wind uplift is the one people underestimate — in a 39 m/s wind zone, a single pedestal can see a few hundred kilograms of lift, which is far more than the weight sitting on it. Anchor for uplift, not for weight.
Step 5: Modules, wiring and earthing
- Mount the modules row by row, torque the clamps to the manufacturer's figure, and keep the row gap you designed for — the gap exists so the front row does not shade the one behind it in December.
- String the array so every string has the same number of modules and sits inside the inverter's MPPT voltage window, with the open-circuit voltage checked at the lowest expected temperature.
- Run the DC in conduit or tray with UV-rated cable, colour coded, no cable hanging on the module frame, and MC4 connectors of one make crimped properly.
- Install the DCDB and ACDB with the fuses, isolators and surge protection the design calls for, and mount the inverter out of direct sun with the clearance the manual asks for.
- Earth everything — module frames, structure, inverter and DC/AC boards — with separate earth pits as per practice, and fit the lightning arrester with its own pit.
- Connect to the consumer's board through a clearly labelled breaker, and leave the wiring diagram and labels behind for the inspector.
For a home system, one or two days of crew time is normal. What slows the roof down is almost never the panels; it is drilling, earthing pits and waiting for a plumber or electrician who was not scheduled.
Step 6: Net meter, inspection and commissioning
With the system physically ready, the vendor files the net meter application on the portal or the DISCOM's system and pays the meter charges. The DISCOM sends an inspector who checks the installation against its safety checklist — earthing, isolation, labelling, protection, the interconnection point and, in many states, the anti-islanding function of the inverter.
Pass the inspection and the DISCOM installs the bidirectional meter and issues the commissioning certificate, which it uploads on the portal. Only then does the system legally export. The full application route, documents and the usual delays are in our net metering process guide.
Step 7: Subsidy claim and handover
After commissioning, the consumer submits bank account details and a cancelled cheque on the portal. The subsidy is credited directly to that account — the portal states within 30 days of the commissioning report. The usual reason for delay is a mismatch between the name on the electricity bill, the Aadhaar and the bank account, so check all three at the survey, not at the end.
Finish the job properly: hand over the warranty documents, the inverter app login and the cleaning schedule, explain how to read the net meter and the credit on the next bill, and tell the customer when to call you. A handover done well is where referrals come from — our sales playbook has more on turning installations into the next enquiry.
Where installations actually get stuck
- Feasibility rejection because the proposed size is over the sanctioned load.
- Name mismatch between the electricity bill, Aadhaar and bank account — fix before applying.
- Non-DCR modules on a subsidised job, which fails at the claim stage after the money is spent.
- Inspection failures over earthing, lightning arrester, labelling or clearance around the array.
- Vendor inactivity — applications held too long without installation put the vendor's registration at risk, so close the ones you have opened.
Most of these are decided in the first hour at the site. A survey that reads the bill properly, respects the sanctioned load and looks at the December shadow prevents the delays that eat the rest of the calendar. Software like PitchSun exists to shorten the middle of this list — design, subsidy and proposal in one visit — but the discipline at the survey is yours.
Frequently asked questions
How long does rooftop solar installation take in India?
The work on the roof usually takes one to three days for a home system. The full journey — application, DISCOM feasibility, installation, inspection, net meter and subsidy credit — commonly runs six to twelve weeks, and most of that is waiting on the DISCOM, not on the installer.
What is the first step of the solar installation process?
A site survey: the installer measures the usable roof area, checks the shadow of tanks, stair rooms and neighbouring buildings, reads the sanctioned load and tariff from the electricity bill, and confirms the roof can take the load. Everything after that — size, price, structure — follows from the survey.
Can I install rooftop solar myself without a registered vendor?
You can install a system privately, but to claim the PM Surya Ghar subsidy you must apply on the national portal and get it installed by a vendor registered with your DISCOM. Self-installed systems are not eligible for the central subsidy.
Who applies for the net meter, the customer or the installer?
The application is in the consumer's name, but in practice the registered vendor files it and follows it up. The consumer signs the net metering agreement and pays the meter and processing charges as per the DISCOM's schedule.
When does the PM Surya Ghar subsidy reach my bank account?
After the system is commissioned and the net meter is installed, the DISCOM uploads the commissioning certificate on the national portal. Once you submit your bank details and a cancelled cheque, the subsidy is credited directly to that account — the portal states within 30 days, and delays usually mean a mismatch in the name or account details.
What can hold up a rooftop solar installation?
The usual culprits are feasibility rejection for a system larger than the sanctioned load, a mismatch between the name on the bill and the applicant, non-DCR modules on a subsidised job, and inspection failures over earthing, lightning arrester or railing clearance.